September 29, 2012

Bountiful Basket

My Saturday morning started off pretty early, which is nothing new but this morning I was ok with it. I did have a good reason for being up early this morning. A few friends of mine have told me about how they love picking up their "bountiful baskets" filled with various fresh produce. So I decided to give it a try! Bountiful Baskets is a co-op run by volunteers only so they get fresh produce at way cheaper prices then what they offer at grocery stores. They offer a conventional produce basket every other week which is 1/2 fruit and 1/2 veggies. It costs $15.00 but it is valued at almost $50.00 if you bought these from your regular grocery stores. If you haven't heard of it before here is their website: Bountiful Baskets You might be lucky and have a pick up location near you too.


This is everything that was in my basket this morning....fresh spinach, green leaf lettuce, collard greens, heirloom tomato, zucchini, avocado, strawberries, apples, plums, bananas and a honeydew melon. Out of all of these fresh produce the collard greens is the only thing I am lost with, have never eaten them and have never cooked them either BUT I will give it a whirl!

My spinach was the first thing I cleaned and used today. As soon as I saw the spinach I knew exactly what I wanted to do with it because it reminded me of a fresh spinach & feta cheese quesadilla I had while on vacation in Izmir, Turkey.....so that is what I made today after cleaning my spinach.

Don't these just look amazing?!
Really simple to make! I put a large flour tortilla into a hot non-stick skillet (no oil), sprinkled it with a little shredded mozzarella & a pinch of italian seasoning (optional), a little pepper. Then topped it with chopped fresh spinach and about 1/4 cup of crumbled feta. Let the tortilla get lightly browned then fold in half. I flip the tortilla once to make sure both sides are heated evenly before taking them out of the pan. Cut in half and eat!! YUM! I will be eating these all week or at least until I have used up all my spinach.


September 19, 2012

Plum Cake

I have to share this with you because I must have looked like a crazy lady at the grocery store when I spotted these!! If you haven't seen these before or have had the pleasure of having a coffee cake with these yummy plums then you are missing out....just kidding.....but really I haven't seen these plums since we left Germany 3 years ago (maybe even longer). These plums are also known as "prune plums" (which I didn't know that these were the kind they used to make prunes with).
I have great memories of picking plums with my grandmother in her backyard and then making at least 2 baking sheets full of "plum cake". Her cake crust was perfectly sweetness and not too soft/not too crispy...it went perfect with the plums. After we baked cake we would have coffee and enjoy a slab of the warm delish. Sometimes she added a sugar crumble over the top of the plums but only if they were too tart.
If you see these in your local grocery store or at your farmers market grab a pound or two and use them to make coffee cake! I am convinced you will enjoy the taste of these!


Plum Cake

1/2 cup butter, softened
1/2 cup sugar
2 eggs
1 tsp vanilla
1 cup flour
1 tsp baking powder
1/4 tsp salt
3 cups sliced fresh plums

Crumble topping:
1/2 cup flour
1/4 cup sugar
1/4 cup cold butter, cubed
**Cut butter into flour and sugar until the mixture looks like pea sized crumbles; set aside for later.

Directions:

Preheat oven to 350F and grease a square 9x9 baking dish.

Cream butter and sugar until creamy; add eggs one at a time. Beat in vanilla.
Sift together dry ingredients before stirring into the butter mixture. Transfer to prepared baking dish and top with plums. Sprinkle crumble topping over the plums.

Bake 50-55 minutes or until crumble is golden. Cool on a wire rack at least 15 minutes before serving.
Store in refrigerator after cake is completely cooled.


Pumpkin Spiced Doughnuts

Fall is slowly making its way to Arizona!! Monsoon season is over and the first day of fall is only 3 days away. I can't wait to turn of our A/C and finally get to open the windows in our house for some fresh air again. Tomorrow is my son's 8th birthday!! Where have the years gone? For his birth"day" he gets to pick dinner since its on a school night and then Saturday we are having a Pool Party for him.....yes, I know I was just talking about how fall is making its way and yes we are still able to have a pool party.....this is the good part of fall season in Arizona. I even went to check the pool yesterday to make sure the water is still comfortable.

This past Sunday my husband woke up and asked if we should go out for breakfast, which I had to turn down since we had been gone all day Saturday and we were going over to friends for a BBQ & Football. I asked him why he wanted to go out for breakfast and he replied with: "I am hungry for something good.....like Pumpkin Doughnuts". I jumped out of bed and said:"I have a recipe I have been wanting to try out for Homemade Pumpkin Doughnuts and I even have pumpkin in the pantry".


 So off to the kitchen I went!
Since I have never even tried making doughnuts EVER before I was not convinced this recipe would work or taste good. The original recipe called for buttermilk, which we never have in the house so instead I use Greek yogurt (this we always have). The dough was super easy to make and it was also really sticky, another reason I didn't think it was going to work. BUT you do have to put the batter in the freezer for 15 minutes before you press it out to cut into shape.

**A little tip: cut all your doughnuts out before heating the oil to fry it in, otherwise you might have a flour mess like I did because I didn't think the doughnuts were going to cook as fast as they did**


Cinnamon & Sugar plunge
Don't mind the jug of baby water in the background my husband pulled the camera out and I was so impressed with the way the doughnuts were turning out and slightly freaked out about all the flour I had tossed all over the kitchen that I didn't even notice the water jug in the background until I went to edit my pictures.

I don't think I will ever buy store bought pumpkin doughnuts again after making these!!! These doughnuts hit the spot on taste, texture and freshness. 


Here is my recipe for:


1 whole egg
1 egg yolk
1 cup canned pumpkin puree (not pumpkin pie filling)
1/2 cup sugar
1/2 cup buttermilk <<<<greek yogurt
1/4 cup brown sugar
3 TBS butter, melted
4 tsp baking powder
2 tsp pumpkin spice
1 TBS salt
1/2 tsp baking soda
3 cups flour, plus extra for patting out

Directions:

In a large bowl whisk together both the whole egg and the egg yolk until frothy. Add pumpkin, sugar, buttermilk (yogurt), brown sugar and butter; whisk until combined. Stir in baking powder, pumpkin spice, salt and baking soda.
Gradually fold in flour until a sticky dough forms; cover and put in freezer for 15 minutes.
Meanwhile get your pan ready for frying. You will need at least 2" of oil.....don't heat until after you have cut your doughnuts.
Take dough out of freezer and pat out on a well floured surface to 1/2" thick and then cut using either a doughnut cutter or 2 biscuit cutters. Transfer these to a floured baking sheet.
Now heat your oil to at least 370F before you start frying your doughnuts. Fry doughnuts and doughnut holes until browned, about 3 minutes turning once halfway through. Keep an eye on these so they don't burn! Place the finished doughnuts on a baking sheet lined with paper towel. When they have cooled enough to touch finish them by dipping them in a cinnamon and sugar mixture. ( 1 cup + 1 tsp cinnamon).


Eat these fresh, they do not taste to great the next day ;-)


September 13, 2012

Wild Rice Chicken Salad


I have had this recipe for a long time, couldn't even tell you where I got it from either but every so often I like to make this. It is a perfect side dish at a BBQ but if you like it as much as I do then you might eat it just on its own. I usually like making this with leftover rotisserie chicken. It is such an easy dish to make and even tastes better if you make it the day before you are planing on eating or serving this.

3 cups cubed cooked chicken or turkey
2 1/2 cups cooked wild rice** (cooled)
1 cup finely chopped carrots
3/4 cup dried cranberries or cherries
1/2 cup sliced green onions
1 Granny Smith, unpeeled & diced
Dressing:
1/4 cup orange juice
1/4 cup cider vinegar
2 tsp dijon mustard
1/2 cup canola oil
1/2 tsp salt
1/4 tsp pepper


Directions:

In a small bowl whisk together the dressing ingredients and then set aside.
In a large bowl combing all your salad ingredients and then toss with dressing. (Did I mention this was easy?) Cover and chill for at least 2 hours before serving.


** for the wild rice I find it cheaper and easier to buy the boxes that come with the seasoning packets. I just cook the rice as directed minus the seasoning. I make two boxes, measure what I need out of the finished rice and save the rest for another meal (Wild Rice Soup).

* you could use a different type of apple, I prefer the tartness of the Granny Smith though.


September 7, 2012

Avocado Ranch Dip with Homemade Chips


I am posting my first recipe to add to MOMS CRAZY COOKING CHALLENGE!! I have wanted to try this recipe out for some time but just haven't.....well this morning I did! I was actually worried about not being able to squeeze this into my schedule (just a bit over scheduled today) doctor appointments, hunting for ballet shoes and new leotard, birthday gift (yes I waited until the day before the party) and grocery shopping for Teacher Appreciation Breakfast at my children's school and homework....yep just a little over scheduled today. Oh well, what does not kill you only makes you stronger...right?


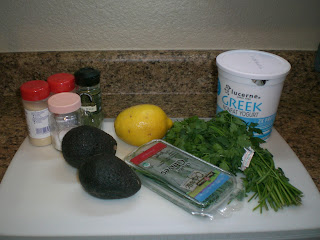
My ingredients....look at those ripe avocados.


Avocados mashed up with herbs and spices


Stirring in greek yogurt

2 avocados

1 cup Greek yogurt

2 tablespoons lemon juice

1-tablespoon fresh chives, finely chopped

1-tablespoon fresh flat-leaf parsley, minced

1 teaspoon dried dill

1-teaspoon onion powder

1-teaspoon garlic powder

1/2-teaspoon kosher salt


Peel and mash avocados. Mix avocados with Greek yogurt and lemon juice. Stir in chives, parsley, dill, onion powder, garlic powder and salt.

Serve with potato chips, pita chips or fresh vegetables for dipping.

Makes 3 cups


Avocado Ranch Dip with Kettle chips (not my homemade ones)


I did try making some homemade chips too....didn't really turn out that great, need a little working on but they were baked and not fried so they were the try.


Photobucket


September 2, 2012

Teriyaki Chicken

A friend of mine suggested placing your slow cooker in the garage or outside on the patio to keep the house from heating up. Which is funny because you read all the time how using your slow cooker shouldn't heat your house up as much as your oven does but I am starting think this is not so true. I find my kitchen gets pretty darn warm when I use my slow cooker, of course all in all it is less then using my oven but still ;-) I didn't put mine out in the garage.....I don't have a covered patio and it is suppose to be 99F outside today, don't think that would be too good for my chicken and I plan on using my oven to try out a new recipe (will share in another post) so the house will heat up anyway!

I don't have any pictures of my prep work because I was in a hurry to get it all into the slow cooker....Andrew started fussing for his bottle and nappy as soon as I started cutting the onions!

Here is my recipe:

Teriyaki Chicken 
Serves 4-6 (we usually have leftovers)

2 1/2 lbs chicken thighs or tenders (today I use frozen thighs)
1 cup brown sugar
3/4 cup soy sauce
1 tsp minced garlic
1 tsp minced fresh ginger
1 medium onion, chopped (I use sweet onion)

Combine everything into your slow cooker. Set temperature on low for 6 hrs.

Serve with rice and your favorite steamed veggies. I like to sprinkle toasted sesame seeds over mine.


FREEZER prepping:

This meal could be divided into two freezer meals for smaller families.

Stir brown sugar, soy sauce, ginger and garlic together into a large bowl.

If you are using fresh chicken....toss chicken and onion in soy mixture and then transfer to a ziploc bag.
If you are using frozen chicken.....place chicken and onion into ziploc bag and then pour soy mixture over it.

Label with cooking directions. Thaw 30 minutes before putting into your slow cooker, no need to thaw completely.